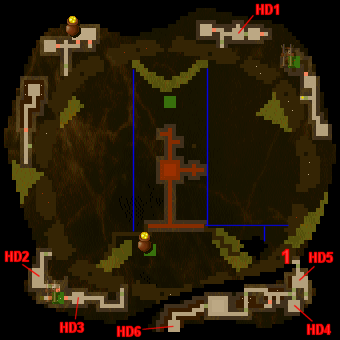
This is possibly one of the hardest official Dungeon Keeper levels. On the surface the premise seems the same as Hearth in the original campaign - you are in the middle of a wide-open realm and will be bombarded from all sides by occasional hero parties. However, this realm has been tweaked so that it is more or less impossible to play the open game here. The absolute only option you have is to wall yourself in, build up to maximum strength, construct an unnegotiable gauntlet of doors and traps, and then open your dungeon at the end of it.
If you play the open game, you will find yourself doing fine at the beginning. A few low-level parties of heroes visit your dungeon, big deal. Then the tunnellers start to release other heroes from the surrounding buildings. Now you're in trouble. But that's not the kicker. At a certain point, long before you have had a chance to train most of your creatures, a party of eight level 10 Barbarians will come marauding from the south and will destroy you without fail. You cannot allow this, and without Boulder or Lava traps, you are unable to effectively defend yourself.
So, with that being said, follow the lines drawn in blue on the map and construct reaching defensive walls which will make the center of the domain yours. The rest is forfeit. Though the surrounding hero keeps contain various goods including Dungeon Specials, unaligned creatures, and useful rooms to claim, getting them both opens you up to all the tunneller parties as well as causes more attacks - before the door to each keep is an action point which will summon even more powerful heroes to attack you.
Though your Imps are only level 1, you will have plenty of time to fortify all of your walls as long as you micromanage your Imps' assignments. The first tunneller party comes from the northeast at around 11 minutes into the game, so begin fortifying the eastern walls first. If you followed my lines exactly, you have connected to four different gold veins, all of which you will be able to mine out as long as you leave the outermost blocks of gold - never open your dungeon up until you have fully prepared. One of your southern veins also contains a one-faced gem tile.
Because your space is extremely limited, you will need to preplan and dig out most of your dungeon rooms. I recommend doing this before claiming the portal in order to save yourself headaches such as Spiders and Flies fighting. Build or reserve space for two 5x5 Lairs, a Hatchery, a Training Room, a Library, enough space for one tile of Barracks, a 3x3 Torture Room, a 5x5 Temple, a 6x5 Graveyard, and the largest Workshop you can possibly build. You may also want space for a large Guard Post on which to occupy idle Vampires, to prevent them from becoming enraged in the Temple. If you think ahead and plan intelligently, there will be plenty of room, though a few of your rooms may need to be shaped oddly (my Hatchery ended up L-shaped, for example).
As you dig near the northeast corner of your Dungeon Heart, you should stumble upon a valuable Increase Level special. Save it for later.
Under all circumstances, keep your rooms isolated from your surrounding Great Walls - there must be only one entrance to your core dungeon, and it must be the one that already exists to the south of your Dungeon Heart.
Build each room as soon as you research them. Once you have the Temple, begin sacrificing any Flies, Beetles, and Spiders you have received. Remember that you can get a Mistress for a Beetle and a Spider, or a Bile Demon for three Spiders. You will not want to sacrifice for Warlocks, and once you have the Graveyard, throw all Warlocks back out. If you build a 30-tile Graveyard in this realm, you can attract Vampires directly from the portal, and you want to do this without fail. You may also want to sacrifice for a Horned Reaper, for which you'll need to get at least one Troll. Throw any others back out. And, although you can also attract Tentacles in this realm, they are really not worth the time it takes to train them.
After obtaining an army of the proper composition, allow all of them to train to level 10. Due to having meager gold and only one face of a gem tile, your finances will remain tight. This is why you must only train one species of creature at a time, torture one of your Vampires to keep their pay down, and sell Magic Doors as fast as you can by having all non-training creatures who can manufacture stay in the Workshop (Dragons, Mistresses, and especially Orcs are your best bet).
If you are lucky, then somewhere around the perimeter of your dungeon will be a tile of unclaimed earth which will have no fog of war, even though it should still be covered. The tunneller parties will circle around the entire realm and hack down nearly every tile of earth or hero wall they can find, so this is bound to occur soon. When it does, you can drop an Imp on the unclaimed earth to expand your view of the realm bit by bit. By doing this, you can also claim the other four level 4 Skeletons, two level 7 Samurai, and the level 4 Horned Reaper who are now wandering about amidst the legions of heroes. Add them all to your army (if you sacrificed for your own Horned Reaper, you will now have two, and you will need them!).
If need be, you can even mine distant gold by tagging one tile and dropping an expendable Imp next to it. Since the Imp cannot reach your Treasure Room, he will just pile the gold up on the ground. Pick up him and the gold each time he mines out a tile. This helps keep your money up while creatures train. Just watch out for heroes. Mining out the gold seems to excite any tunnellers around to come investigate the mysterious changes to their precious gold seams.
However, beware. Do not drop your Imp or cause an unaligned creature to join your cause anywhere near any of the entrances to the various hero buildings, and absolutely do not, under any circumstance, approach point 1 on the map. Doing these things, especially the last, will compound your grief as more and more heroes are added to the throngs which already surround you.
(Approaching point 1 starts a constant, unbounded, timed drop of hero parties from two doors inside the southern hero fortress, which will add an indefinite number of heroes to the realm. Doing this early enough may in fact cause the game to crash, and it will at any rate make your upcoming task virtually impossible.)
Once all of your creatures have trained, you need to stop selling Magic Doors and begin the construction of the greatest trap gauntlet to have ever been constructed in the underworld. Beginning from the very end of your left-hand Great Wall, begin laying down traps in a Word of Power, Lightning, Poison Gas sequence, and place a Magic Door between every three traps. Wrap this gauntlet around to the south end of your dungeon and then continue it all the way into your heart room (when you reach the areas where your rooms are, omit Poison Gas traps, as these will damage your own creatures, and fill your Heart Room solely with long-lived Lightning Traps).
When all creatures are trained and the gauntlet is complete, save your game, then tear down a single tile of fortified wall at the end of your gauntlet. The heroes will come in short order - all of them, at once. You can use your Cave-In and Chicken spells to repel them and do extra damage, but beware of running your gold too low. Replace Magic Doors as the heroes begin hacking them down in order to separate them into several groups and to allow your traps more time to do damage. Most of the heroes should not survive the gauntlet. Those who do will be so severely weakened that your mob of hopefully 25 creatures can destroy them easily. Drag the resulting bodies to your Graveyard as soon as you get the chance to make more Vampires.
Once all of the heroes have come crawling to meet their doom, the first phase of the realm is complete. Sadly, this is just the beginning, and the worst is coming quite swiftly. If every hero in the realm has died, you will trigger the end phase, which consists of a three-phase attack by incredibly strong parties of heroes, culminating in an attack by the Lord of the Land himself. In the event that some heroes are still alive (there are some glitchy Fairies which may not have attacked you), then this is to your benefit. Have your Imps refresh your trap gauntlet as quickly as possible, and keep the outermost door locked so that they cannot run out and cause trouble by triggering more hero drops or setting off traps.
Once all of the heroes are vanquished, which you will need to accomplish personally if they did not all come to attack you, the first wave of elites will issue forth from multiple hero doors to the south, and they consist of several groups of powerful level 8 Giants and a lesser group of level 5 Archers. You must kill all of these heroes in order to start the second phase attack. Note that at this point, having triggered the constant hero drops by visiting point 1 makes this stage of the game an absolute nightmare, so you should continue to avoid that at all costs.
The second phase comes when at least 500 gameturns have passed and there are once again no heroes in the realm. There will not be enough time to fully refresh your gauntlet if you let them come directly to you, so use your Chicken and Cave-In spells liberally to drive the heroes back toward their own domain. Heroes who die will drop a large amount of money that will help offset the cost of these spells, but you will have to move it to your Treasure Room using the Hand of Evil, which is terribly slow.
The second wave is incredibly strong, consisting of a party of level 9 Thieves and level 10 Dwarves, a party of level 9 Barbarians and level 10 Giants, and worst of all, a total of 10 level 9 Samurai led by level 10 Priestesses in two separate parties. If all of these Samurai make it into your dungeon unscathed, you will be defeated without question. You must do your best to make sure that they are weakened before reaching the inner sanctum of your dungeon.
You must again vanquish all of the heroes of the second wave. Once they are all dead and at least 750 gameturns have passed, the third and final wave will arrive. From the hero door deep within the hero fortress to the south will come four parties of heroes, including the Lord of the Land. Five more level 8 Giants, two level 7 Archers, two level 7 Priestesses, two level 6 Archers, two level 7 Wizards, three level 9 Barbarians, and the level 10 Knight himself altogether. Use the same tactics once again to divide and conquer. You must again kill all heroes, and doing so will give you victory, even without destroying the Hero Dungeon Heart.
There are various treasures scattered about the bordering areas. Although it is now safe to retrieve them, as your victory stops any further hero drops, they are now useless to you. Amongst these are a laughable Make Safe special, an Increase Level special, a Steal Hero special that might have been useful a few minutes ago, a handy Reveal Map special, a couple of Prisons, and the elusive Scavenger Room. Since this entire map turns into one giant open room, you will have no trouble finding these things if you still want them, and so I have not marked them on the map.
You may also now safely destroy the hero fortress to the south if you desire to take your revenge. Personally, I ripped down every wall and covered its floors with Hatcheries as an insult to my fallen enemies. A hard-earned victory indeed.
(Again this level has many bugs in the script and in the map itself, and it also shows evidence of having been tampered with by someone other than the primary author. Evidently the strong parties of Barbarians and Monks who make this level virtually impossible to play in an open-dungeon strategy were added by this third party, and as a result, the balance of what might otherwise be a fair map is destroyed. But I guess this was the intent of the designers, and the result is one of the most nail-biting levels I have ever played.)
For completeness, here is a schedule of hero drops and a list of parties that enter when given action points are triggered: